As Easter approaches, my kitchen transforms into a mini bakery filled with the sweet fragrance of citrus and freshly baked bread. There’s a special recipe that holds a cherished spot in my family traditions: Easy Sweet Italian Easter Bread. Growing up, I remember my grandmother teaching me how to braid the dough, her weathered hands guiding me through the process. The joy in her eyes as we tucked colorful eggs into the braid still warms my heart. This bread isn’t just a recipe; it’s a cherished family memory, a symbol of celebration, and an aromatic reminder of love.
What sets this Easy Sweet Italian Easter Bread apart from others? It’s the perfect combination of sweet and soft, with a touch of buttery richness and a hint of zesty lemon that dances on your palate. Plus, you get to customize it with colorful eggs, which is a festive touch that the kids love. Instead of store-bought bread, making this from scratch not only fills your home with delightful scents but also transforms your kitchen into a cozy gathering spot.
In this post, I’ll take you through each step of creating this gorgeous Easter bread, ensuring that every braid, every egg, and every taste is perfect. You’ll learn how to embrace the art of bread-making, and I promise, once you try this recipe, it will become a beloved tradition in your home just like it is in mine.
What Are Easy Sweet Italian Easter Breads?
The origins of Easy Sweet Italian Easter Bread harken back to Italian-American households, where it was traditionally made to celebrate the joyous occasion of Easter. These breads symbolize new life, often adorned with colorful eggs that represent the arrival of spring. The dough is sweet and enriched, yielding a soft, pillowy texture. Imagine cracking open a piece of this freshly baked bread, releasing a cloud of sweet, buttery aroma. The first bite reveals a delightful chewiness, with a subtle sweetness perfectly balanced by the citrus notes from the lemon zest.
What makes this bread truly unique is its braided presentation and the addition of dyed eggs, making it an eye-catching centerpiece for your holiday table. Whether you’re making it for a large family gathering or simply to enjoy at home, this bread is a testament to the joy of cooking and sharing—a perfect way to ring in the Easter celebrations.
Why You’ll Love This Recipe
Irresistibly Delicious: Your taste buds will be delighted by the sweet, buttery, and zesty flavor profile of this Easter bread. The texture is unbelievably soft, making it perfect for pulling apart and sharing with loved ones.
Cost-Effective: Why spend a fortune on store-bought breads, when you can whip up a batch for just a fraction of the cost? The ingredients are simple and pantry-friendly, making it easier than ever to enjoy homemade goodness.
Customizable: Feel free to personalize your bread! You can add flavors like almond extract or even incorporate dried fruits and nuts for an added twist. Plus, let your creativity shine with colorful egg decoration—perfect for kids and festive gatherings!
Beginner-Friendly: Even if you’re a novice baker, you’ll find this recipe straightforward and enjoyable. The kneading and braiding processes are great for honing your skills while still being forgiving for beginners.
Heartfelt Traditions: Baking this bread connects you to a long-standing tradition filled with love, family, and celebration. Once you experience the joy of making it, you’ll want to create these memories year after year.

Ingredients
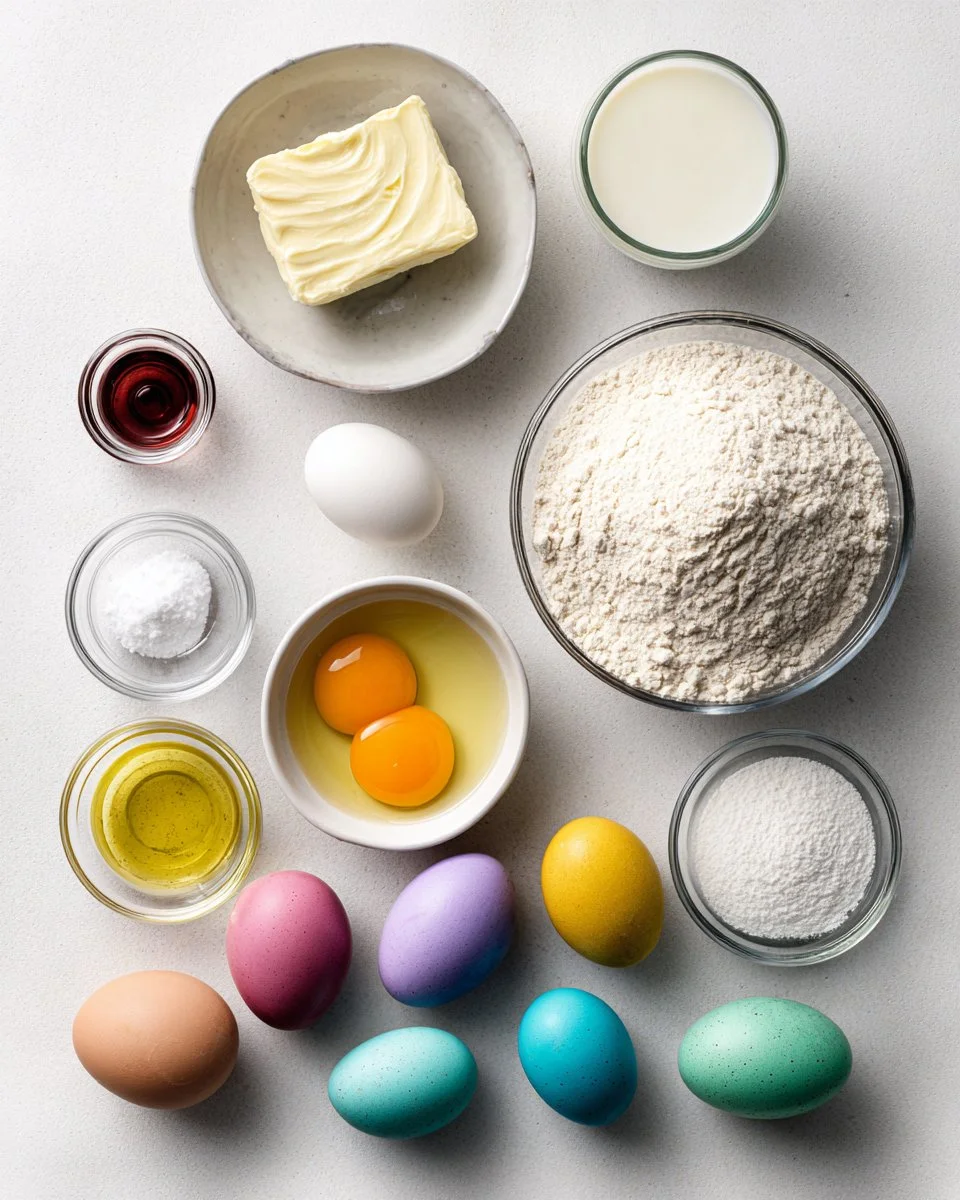
Here’s what you need to make Easy Sweet Italian Easter Bread. You’ll find that each ingredient plays a crucial role in achieving that perfect balance of flavor and texture.
- 4 cups all-purpose flour: For the best result, use high-quality flour like King Arthur Flour, which has a great protein content for bread-making.
- 1/2 cup sugar: Enhances the sweetness and encourages the yeast to thrive.
- 1 packet active dry yeast: Make sure it’s fresh for that perfect rise!
- 1 cup warm milk (110°F/43°C): Room temperature milk works too! This nourishes the yeast, giving your dough the lift it needs.
- 1/2 cup unsalted butter, melted: Adds richness to the dough; make sure it’s cooled slightly before mixing.
- 2 large eggs: Room temperature eggs yield a better binder and create a richer flavor.
- 1 teaspoon vanilla extract: A touch of sweetness that complements the dough.
- 1 teaspoon lemon zest: Adds a delightful freshness that elevates the overall flavor.
- 1/2 teaspoon salt: Balances the sweetness and enhances the overall flavor.
- Colorful eggs: Decorate the braids with dyed eggs. Make sure they’re hardboiled!
Prep Notes
- Ensure your butter is at room temperature for easy blending.
- If you’re new to baking with yeast, make sure the milk is warm (not hot) to activate the yeast correctly.
Step-by-Step Instructions
Now let’s get our hands a little floury! Here’s how to craft your Easy Sweet Italian Easter Bread from scratch:
Activate the Yeast: In a bowl, combine warm milk and yeast. Let it sit until frothy, about 5 minutes. This shows your yeast is alive and ready to work.
Mix Dry Ingredients: In a large mixing bowl, whisk together flour, sugar, and salt. This incorporates ingredients evenly before adding the wet ones.
Combine Wet Ingredients: Add melted butter, eggs, vanilla extract, and lemon zest to the flour mixture. Mix until gently combined.
Incorporate the Yeast Mixture: Pour the yeast mixture into the bowl and mix until a dough forms. Use a wooden spoon or spatula to combine everything well.
Knead the Dough: On a lightly floured surface, knead the dough until smooth, about 10 minutes. If it’s sticky, add a little more flour a tablespoon at a time.
First Rise: Place the dough in a greased bowl, cover with a damp cloth, and let it rise until doubled in size, about 1 hour. Find a warm spot to encourage rising!
Preheat the Oven: Preheat your oven to 350°F (175°C) during the last 10 minutes of rising.
Shape the Bread: Punch down the risen dough and divide it into three equal pieces. Roll each piece into long strands, about 12-14 inches long. Braid the strands together to form a loaf.
Prepare for Topping: Place the braided dough on a baking sheet lined with parchment paper. Tuck colorful hardboiled eggs into the braid, securing them firmly.
Second Rise: Let the braided loaf rise again for about 30 minutes. It should puff up a bit more.
Bake the Bread: Bake for 25-30 minutes until golden brown and the loaf sounds hollow when tapped on the underside. It’s a delightful moment of wonder!
Cool: Allow to cool for at least 10 minutes before serving. Enjoy the aroma filling your kitchen!
Chef’s Tips:
- If you’re using colored eggs, let them cool completely before tucking them in.
- Avoid over-kneading to keep the bread soft and fluffy.
Common Mistakes to Avoid:
- Not letting your yeast activate properly can lead to dense bread.
- Cramming all ingredients together without measurement can lead to imbalance.
Professional Techniques:
- You can also make a simple glaze with a beaten egg and a splash of milk brushed on top before baking for an extra shine!
Expert Tips & Tricks
Ingredient Quality: Using fresh, high-quality ingredients is vital for the best flavor. Look for organic flour and farm-fresh eggs if possible.
Temperature Control: Ensure your kitchen is at a warm temperature, especially during the rising process. You can utilize an oven set at the lowest temperature and then turned off to create a cozy environment for the dough.
Storage: Store any leftover bread wrapped tightly in plastic wrap at room temperature for up to 2 days. For longer storage, freeze slices in freezer bags for up to 3 months.
Make-Ahead: Prepare the dough one day ahead and let it rise in the refrigerator overnight for more flavor development. Just bring it back to room temperature before shaping.
Troubleshooting: If your bread isn’t rising, check the freshness of your yeast or try creating a warmer environment for rising (like a turned-off oven with a bowl of warm water).
Serving: This bread is perfect for breakfast with butter, or as an accompaniment to your Easter feast!
Serving Suggestions
This Easy Sweet Italian Easter Bread is a star on its own, but it pairs beautifully with a variety of dishes. Serve it alongside a fresh fruit salad for a light breakfast or with a rich Easter ham and cheesy sides at your holiday gathering. For presentation, consider making individual buns from the dough for personal servings; they make a lovely addition to any table!
Variations & Substitutions
Flavor Combinations: Try adding cardamom or cinnamon for a warm spice twist, or substitute the lemon zest for orange zest for an entirely different citrus flavor.
Dietary Restrictions: For vegan adaptations, substitute the butter with coconut oil and use flax eggs in place of the eggs (1 tbsp flaxseed meal + 2.5 tbsp water = 1 egg).
Seasonal Variations: During different holidays, consider adding seasonal spices or of course, alternatively, dyeing the eggs to match the season.
Nutrition & Storage Info
- Prep Time: 15-20 minutes
- Cook Time: 25-30 minutes
- Total Time: Approximately 2 hours (including rising time)
- Yield: 1 large loaf (serves about 12)
- Estimated Calories per Serving: Approximately 150-180 calories
- Storage Instructions:
- Room Temperature: Wrap in plastic; good for 2 days.
- Refrigerator: Not recommended, as it may dry out.
- Freezer: Freeze for up to 3 months.
FAQ Section
1. Can I use whole wheat flour instead of all-purpose flour?
Yes, you can, but the texture will be denser. Consider using a mix of both for a healthier option.
2. What if my dough doesn’t rise?
It could be that your yeast is old or the environment is too cold. Try placing it in a warm spot or using fresh yeast.
3. How do I know when my bread is done baking?
The bread will be golden brown on top and sound hollow when tapped on the bottom.
4. Can I add fillings to the bread?
Absolutely! Consider adding chocolate chips, dried fruits, or nuts before braiding.
5. What can I use instead of lemon zest?
You can substitute it with orange zest or simply omit it for a more neutral flavor.
6. Why did my bread come out too dry?
It might be due to over-kneading or baking for too long. Ensure monitoring closely towards the end of the baking time.
7. Is this recipe suitable for gluten-free diets?
Yes, but you’ll need to use a gluten-free flour blend and possibly add a binding agent like xanthan gum.
8. Can I make the dough ahead and freeze it?
Yes, you can freeze the shaped dough! Just make sure to let it rise again once it’s thawed.
9. How do I decorate the bread with eggs?
Simply hard boil your eggs, dye them, and tuck them into the braids before baking.
10. Can I skip the second rise?
For the best results, I recommend not skipping it! The second rise enhances the texture and flavor.

Conclusion
Baking this Easy Sweet Italian Easter Bread is more than just a recipe; it’s about creating beautiful memories that you and your loved ones will cherish. Your home will be filled with the most delightful aromas, and your table will boast a gorgeous centerpiece—perfect for celebrating new beginnings. I encourage you to try this recipe and make it a family tradition in your own home. Please share your results and feedback in the comments—I love hearing how things go! If you’re looking for more festive treats, check out my other Easter recipes on the blog.
Irresistible Cinnamon Coffee Cake Muffins: A Comforting Delight You Need to Bake Today!
Happy baking!

Easy Sweet Italian Easter Bread
Ingredients
Method
- In a bowl, combine warm milk and yeast. Let it sit until frothy, about 5 minutes.
- In a large mixing bowl, whisk together flour, sugar, and salt.
- Add melted butter, eggs, vanilla extract, and lemon zest to the flour mixture. Mix until gently combined.
- Pour the yeast mixture into the bowl and mix until a dough forms.
- Knead the dough on a lightly floured surface until smooth, about 10 minutes.
- Place the dough in a greased bowl, cover with a damp cloth, and let it rise until doubled in size, about 1 hour.
- Preheat your oven to 350°F (175°C) during the last 10 minutes of rising.
- Punch down the risen dough and divide it into three equal pieces. Roll each piece into long strands, about 12-14 inches long. Braid the strands together to form a loaf.
- Place the braided dough on a baking sheet lined with parchment paper. Tuck colorful hardboiled eggs into the braid.
- Let the braided loaf rise again for about 30 minutes.
- Bake for 25-30 minutes until golden brown and hollow when tapped on the underside.
- Allow to cool for at least 10 minutes before serving.