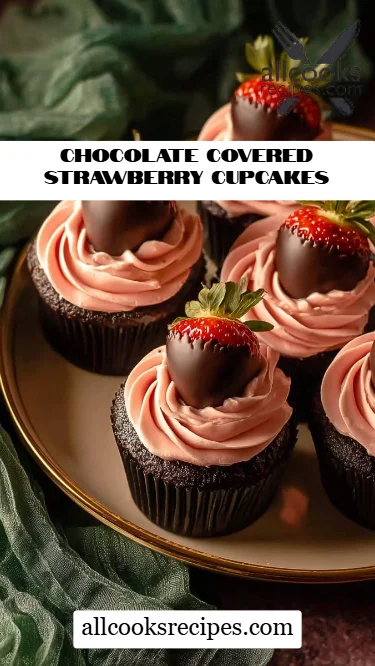
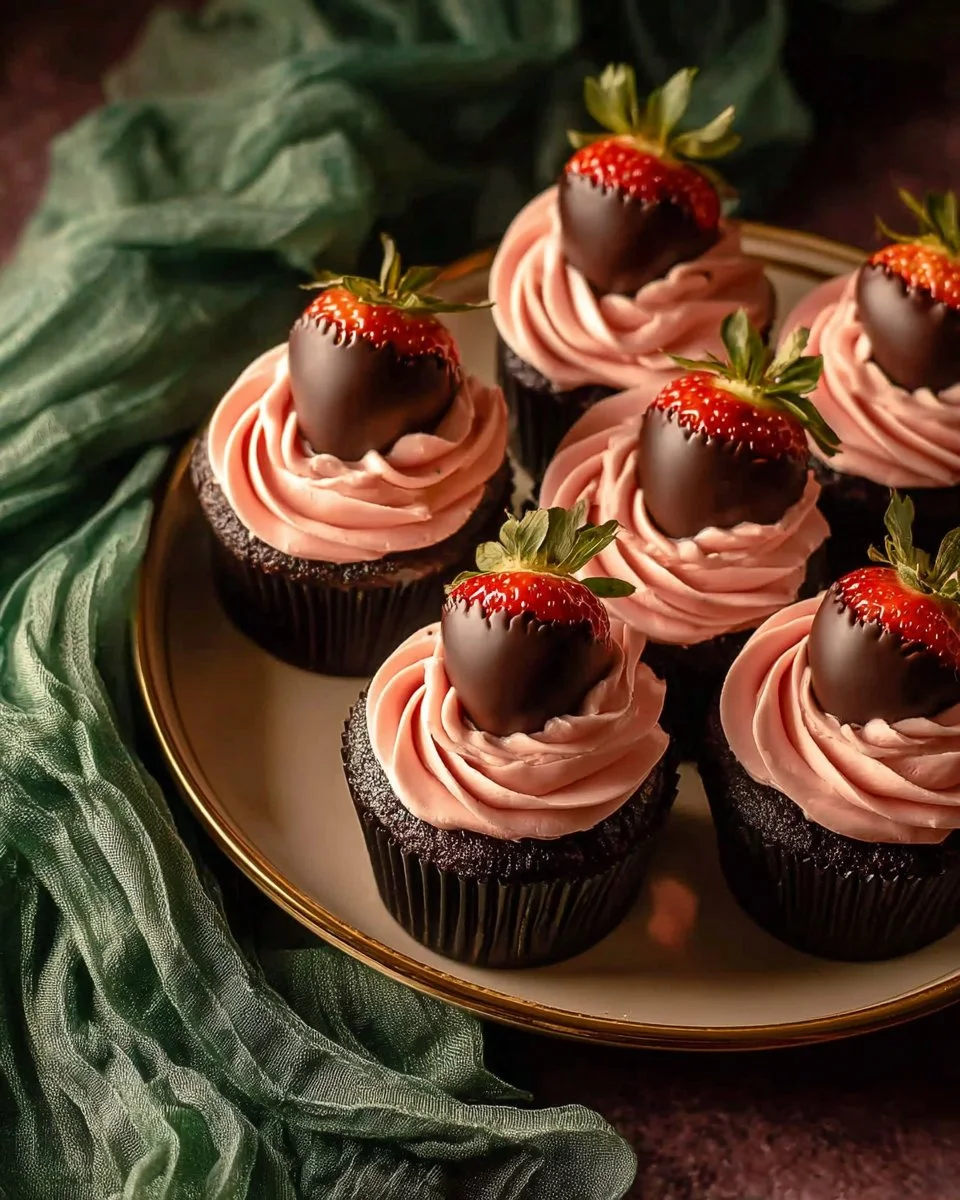
Delicious Chocolate Covered Strawberry Cupcakes: A Love Story in Every Bite
Let me take you back to a sunny afternoon when I first stumbled upon the enchanting combination of chocolate and strawberries. It was a family gathering, and my grandmother was bustling around the kitchen, expertly dipping fresh strawberries into velvety chocolate. The sight was mesmerizing, but the taste was pure magic—you can only imagine how the combination of rich chocolate and juicy strawberries melted in my mouth! Fast forward to today, and I’ve transformed that classic flavor into something even more delightful: Chocolate Covered Strawberry Cupcakes.
What makes these cupcakes so special? They are an irresistible blend of moist chocolate cake topped with heavenly strawberry frosting and adorned with a chocolate-dipped strawberry on each one. Unlike many other recipes, this one carries the warmth of family memories and the joy of creating something beautiful to share with those you love. As you venture through this easy-to-follow recipe, I promise you’ll learn not just how to bake these decadent cupcakes, but also how to create cherished moments in your own kitchen. Let’s jump in!
What Are Chocolate Covered Strawberry Cupcakes?
The idea of combining chocolate and strawberries is nothing new, but it feels like a little love song that never goes out of style. These Chocolate Covered Strawberry Cupcakes are a sweet tribute to that classic dessert pairing, transforming it into a delightful cupcake experience.
Imagine biting into a soft, moist chocolate cake that is rich yet perfectly balanced by the freshness of a strawberry frosting infused with pulverized freeze-dried strawberries. The creaminess of the buttercream and the crunch of the chocolate-dipped strawberry create a symphony of textures that dance on your taste buds.
These cupcakes are perfect for any celebration—birthdays, anniversaries, or even a sweet treat to elevate an ordinary Tuesday! The vibrant colors and tempting flavors are sure to impress, making them a standout dessert that guests will remember long after the last crumb is devoured.
Why You’ll Love This Recipe
-
Irresistibly Delicious: These cupcakes are a dessert lover’s dream! The rich chocolate cake combined with the strawberry frosting and topped with fresh, chocolate-dipped strawberries is simply divine.
-
Cost-Effective: Why spend money on a store-bought treat when you can create something exceptionally delicious at home? This recipe allows you to whip up an entire batch of cupcakes for a fraction of the cost while using quality ingredients you trust.
-
Easy Customization: Want to switch things up? You can easily customize these cupcakes! Try different berry toppings like raspberries or blueberries, or switch the chocolate cake for vanilla cake if that’s more your style.
-
Beginner-Friendly: You don’t need to be a professional baker to create these beautiful cupcakes. The recipe is straightforward and easy to follow, perfect for beginners while still delivering stunning results.
-
Great for Any Occasion: Whether it’s Valentine’s Day, a wedding shower, or a casual get-together, these cupcakes are visually appealing and will add that wow factor to any event.
Ingredients
- 1 1/4 cups all-purpose flour: Look for unbleached flour for the best texture.
- 1 1/4 cups granulated sugar: Sweetens the cupcakes beautifully.
- 3/4 cup cocoa powder (sifted): High-quality Dutch-processed cocoa adds richness.
- 1 tsp baking powder: Helps to lift the cupcakes.
- 1/2 tsp baking soda: For extra leavening.
- 1/2 tsp salt: Balances the sweetness.
- 1 large egg (room temperature): Brings moisture and binds the ingredients together.
- 1/2 cup buttermilk: Adds tanginess and moisture; you can substitute with milk + vinegar if needed.
- 1/2 cup vegetable oil: Keeps the cupcakes moist; you can also use melted coconut oil.
- 1 1/2 tsp vanilla extract: Always choose pure vanilla for the best flavor.
- 1/4 tsp espresso powder: Enhances the chocolate flavor—don’t skip this!
- 1/2 cup hot water: Activates the cocoa and enriches the batter.
- 1 1/4 cups unsalted butter (softened): For creamy, dreamy frosting.
- 3 1/2 cups powdered sugar: Sweetens the frosting.
- 1 oz freeze-dried strawberries (pulverized): Adds a burst of intense strawberry flavor.
- 3 tbsp heavy cream: Makes the frosting creamy and smooth.
- 1 tsp vanilla extract: For extra flavor in the frosting.
- 16 fresh strawberries (washed and patted dry): These will be dipped in chocolate for topping.
- 10 oz chocolate wafers: Choose high-quality chocolate; preferably semi-sweet.
Step-by-Step Instructions
-
Preheat your oven to 350°F (175°C) and line a cupcake pan with paper liners. (Chef’s Tip: Let’s get that oven nice and warm while we prepare the batter!)
-
In a large mixing bowl, combine the flour, sugar, sifted cocoa powder, baking powder, baking soda, and salt. Mix until evenly distributed.
-
In a separate bowl, whisk together the egg, buttermilk, vegetable oil, vanilla extract, and espresso powder.
-
Pour the wet mixture into the dry ingredients and stir until just combined—don’t overmix!
-
Add the hot water and mix gently until smooth. The batter will be thin—that’s exactly what you want!
-
Divide the batter among the lined cupcake liners, filling each about 2/3 full. Bake for 18-21 minutes, or until a toothpick inserted in the center comes out clean. (Chef’s Tip: Keep an eye on them after the 18-minute mark to avoid over-baking!)
-
Let cool in the pan for 10 minutes, then transfer to a wire rack to cool completely.
-
For the frosting: Beat the softened butter until pale and creamy. Gradually add the powdered sugar and strawberry powder, then beat until fluffy. Add the vanilla extract and heavy cream until the frosting reaches a spreadable consistency.
-
Frost each cooled cupcake generously with the strawberry buttercream.
-
Melt the chocolate wafers in the microwave, stirring until smooth.
-
Dip each fresh strawberry in the melted chocolate, allowing the excess to drip off, then place them on parchment paper to set.
-
Once set, place a chocolate-dipped strawberry atop each frosted cupcake and serve.
Expert Tips & Tricks
- Use Room Temperature Ingredients: This allows for better emulsification and moisture in your cupcakes.
- Choose Quality Ingredients: High-quality cocoa and chocolate will make a noticeable difference in flavor.
- Make-ahead Option: You can bake the cupcakes a day in advance. Store them in an airtight container at room temperature.
- Frosting Storage: Leftover frosting can be stored in the fridge for up to a week—just re-whip before using!
- Avoid Overmixing: This is key for a tender cupcake. Mix just until the ingredients are combined.
Serving Suggestions
Since these Chocolate Covered Strawberry Cupcakes are already so beautiful on their own, a simple presentation is often best! Serve them on a lovely cake stand or platter, perhaps with a drizzle of chocolate sauce for that extra touch. Pair them with a glass of chilled milk or a scoop of vanilla ice cream for a heavenly dessert experience. They also make a stunning addition to any dessert table at celebrations, drawing everyone’s eyes (and taste buds!).
Variations & Substitutions
Feel like getting creative? Here are some fun ways to mix things up:
- Different Berries: Use raspberries or blueberries on top for a delightful twist.
- Nut Allergy?: Substitute the chocolate wafers with dairy-free chocolate or use silken tofu for a creamy filling adapted to dietary restrictions.
- Seasonal Touch: Top with pumpkin spice frosting in the fall or a light lemon glaze in the spring.
Nutrition & Storage Info
- Prep Time: 20 minutes
- Cook Time: 20 minutes
- Total Time: 40 minutes (plus cooling)
- Yield: 12 cupcakes
- Estimated Calories: Approximately 350 calories per cupcake
- Storage Instructions: Store in an airtight container at room temperature for up to 3 days or in the fridge for up to a week. For longer storage, freeze unfrosted cupcakes for up to 3 months.
FAQ Section
-
Can I use regular milk instead of buttermilk?
- Yes! Combine 1/2 cup of milk with 1/2 tablespoon of vinegar and let it sit for 5 minutes.
-
Can I make these cupcakes gluten-free?
- Absolutely! Substitute the all-purpose flour with a gluten-free flour blend that contains xanthan gum.
-
How do I make sure my cupcakes don’t sink?
- Ensure your baking powder is fresh, and avoid overmixing to keep them light and airy.
-
Can I prepare the batter the night before?
- It’s best to bake the cupcakes immediately for the best rise.
-
What’s the best way to store leftovers?
- Place them in an airtight container at room temperature or in the fridge for best results.
-
Can I add chocolate chips to the batter?
- Yes, fold 1/2 cup of semi-sweet or dark chocolate chips into the batter before baking for extra chocolatey goodness.
-
Do I need to sift the powdered sugar?
- Sifting is not necessary for the frosting but can help ensure a smoother texture.
-
What should I do if my frosting is too thick?
- Just add a little more heavy cream, one tablespoon at a time until it reaches your desired consistency.
-
What can I substitute for the chocolate wafers?
- You can use chocolate chips or melting chocolate, just ensure they’re of good quality!
-
Can I make mini versions of these cupcakes?
- Yes! Reduce the baking time to about 12-15 minutes for mini cupcakes.
Conclusion
These Chocolate Covered Strawberry Cupcakes are not just a treat; they are a delightful journey of flavors and memories! With every bite, you’ll savor the love and care that goes into creating them, making them the perfect addition to any occasion. I encourage you to whip up a batch and share them with your loved ones; their reactions will surely warm your heart!
Have you tried baking these cupcakes or any variations? I would love to hear your feedback and see your baking creations. Don’t forget to check out more of my related recipes on the blog for even more delicious inspiration. Happy baking!