Delightfully Creamy Chickpea Hummus Recipe: A Flavorful Journey You Can’t Miss!
Growing up, weekends meant cozy gatherings around our kitchen table, where we’d enjoy vibrant conversations and delicious homemade dishes. One of my family’s favorites was always chickpea hummus, its creamy texture and fresh flavors a perfect fit for our veggie platters and warm pita bread. Believe me when I say there’s nothing like the fragrance of garlic and lemon swirling together in the kitchen to make your heart smile!
What makes my chickpea hummus special is the addition of peanut butter—a hidden gem that takes the classic recipe to new heights! This creamy delight has a rich, nutty flavor that you won’t easily find in store-bought versions. Plus, it’s so simple to make! Whether you’re seeking a comforting snack or the perfect side for a gathering, this recipe promises to bring comfort and happiness to your palate and your loved ones.
In this post, I’ll share my tried-and-true recipe for this delightful dish, alongside tips on how to customize it to suit your taste and occasion. Get ready to whip up the smoothest chickpea hummus you’ve ever tasted!
What Are Chickpea Hummus?
Hummus has its roots in the Middle Eastern and Mediterranean regions. Traditionally made with chickpeas, tahini, garlic, and olive oil, this versatile dip has traveled the world and evolved into many exciting variations, including the one I’m sharing today. Chickpea hummus boasts a wonderfully creamy texture, making it perfect for dipping bread or vegetables, or even as a spread on sandwiches.
The unique combination of flavors in my chickpea hummus, thanks to the peanut butter and spices, creates a taste that’s both nutty and aromatic with a hint of warmth from the spices. It’s a recipe that’s not only delicious but also a fantastic way to bring friends and family together to enjoy.
You can whip this up for a casual weeknight snack, serve it at a party, or even take it as a healthy option to a potluck. Trust me, once you make this creamy chickpea hummus, it will quickly become a staple in your kitchen!
Why You’ll Love This Recipe
Here are a few reasons why my chickpea hummus recipe will quickly become a hit in your home:
-
Amazing Flavor: The addition of peanut butter elevates the classic taste profile, bringing a smooth and slightly nutty richness that perfectly balances the spices.
-
Affordable Ingredients: Hummus is made from a simple list of pantry staples—one can of chickpeas, some garlic, lemon, and spices. Compared to pre-packaged hummus, making your own saves money without sacrificing taste!
-
Customizable: Feel free to experiment! Add roasted red peppers, fresh herbs, or chili flakes for an extra kick. I love keeping it fresh and seasonal depending on what veggies I have on hand.
-
Health Benefits: Chickpeas are packed with protein and fiber, meaning you’re not just snacking; you’re nourishing your body. This recipe offers a guilt-free indulgence that’s both satisfying and nutritious.
-
Quick and Easy: With just a few simple steps in your food processor, you’ll have creamy chickpea hummus ready in under 10 minutes, making it perfect even for last-minute cravings!
So, roll up your sleeves and let’s dive into this delightful method of creating chickpea hummus that will leave your taste buds dancing!
Ingredients Section
Here’s what you’ll need to create the most flavorful chickpea hummus:
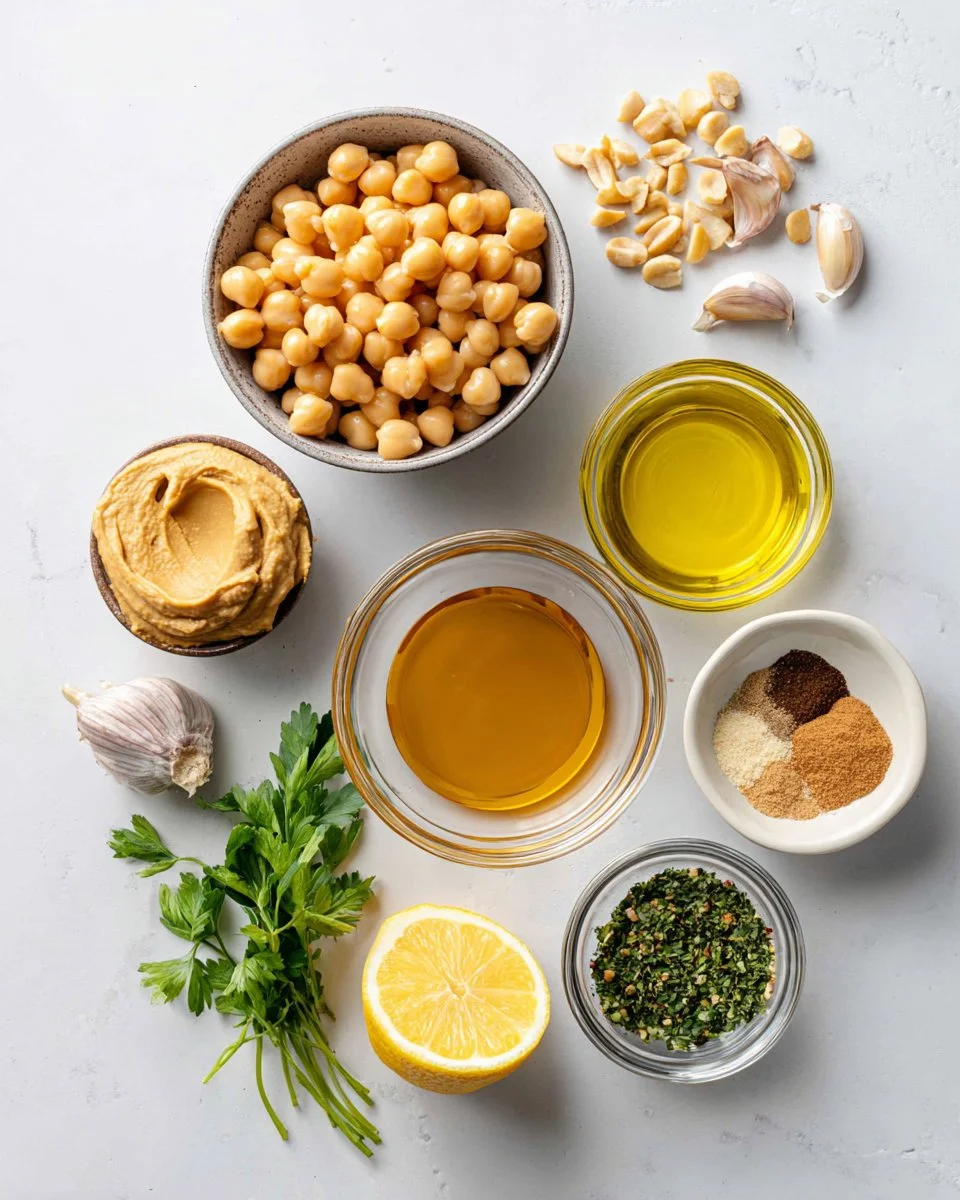
- 1 x 400g (14 oz) can chickpeas, drained (liquid reserved): Choose high-quality chickpeas for the best results; organic brands often provide a richer flavor.
- 2 cloves garlic: For a robust taste, you can either roast the garlic first to mellow its sharpness or use it raw for a strong flavor punch.
- 1/4 cup peanut butter: Creamy, unsweetened peanut butter is ideal; this adds a unique twist to classic hummus. Look for brands without added sugar or additives.
- Juice of 1/2 lemon: Fresh lemon juice adds brightness. Make sure to roll the lemon on the counter before cutting to release more juice!
- 1 teaspoon ground coriander: For a warm, citrusy note that enhances the flavors beautifully.
- 1 teaspoon ground cumin: Adds a fragrant earthiness that complements the chickpeas.
- 1 teaspoon onion powder: In case you want to keep it mild yet flavorful without adding fresh onions.
- 1/2 to 1 teaspoon salt, to taste: Start with less; you can always adjust after blending.
- 1/3 cup reserved chickpea liquid: This magic ingredient, also known as aquafaba, helps achieve the desired creaminess.
- Fresh herbs (for topping): Consider parsley, cilantro, or even mint for a fresh finish.
- Roasted peanuts (for topping): They add a delightful crunch.
- Olive oil (for drizzling): Use a high-quality extra virgin olive oil for an aromatic finish.
Preparation Notes: Let the peanut butter come to room temperature for easier mixing. If you prefer extra creaminess, feel free to add another tablespoon or two of peanut butter!
Step-by-Step Instructions
-
Drain the chickpeas: Start by draining the chickpeas, making sure to reserve the liquid (aquafaba). This will help adjust the consistency later.
-
Add ingredients to the processor: Add the chickpeas, peanut butter, garlic, lemon juice, ground cumin, ground coriander, onion powder, and salt to your food processor.
-
Blend it up: Pour in 1/3 cup of the reserved chickpea liquid to further assist the blending process. Blend for about 2 to 3 minutes. Pause to scrape down the sides of the bowl to ensure an even consistency. You’re looking for a smooth and creamy texture here!
Chef’s Tip: If your hummus seems too thick after blending, you can add more reserved chickpea liquid a tablespoon at a time until you reach the desired consistency.
-
Final fluff: To keep your hummus fresh and airy, drop in an ice cube and blend again for 10-15 seconds. This little trick makes a world of difference!
-
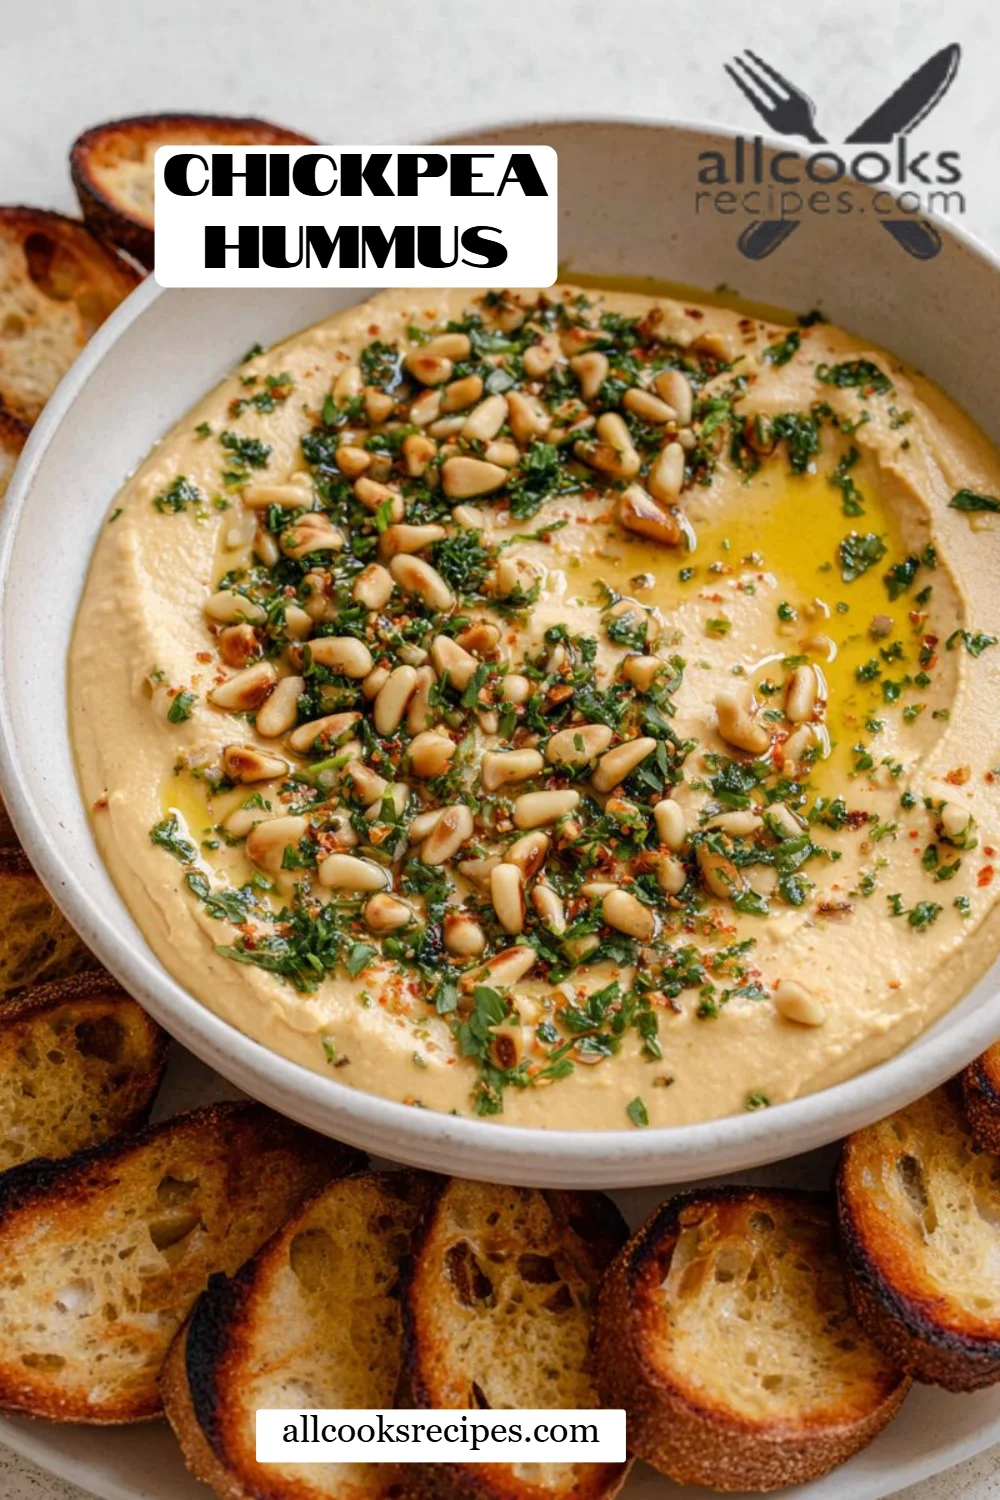
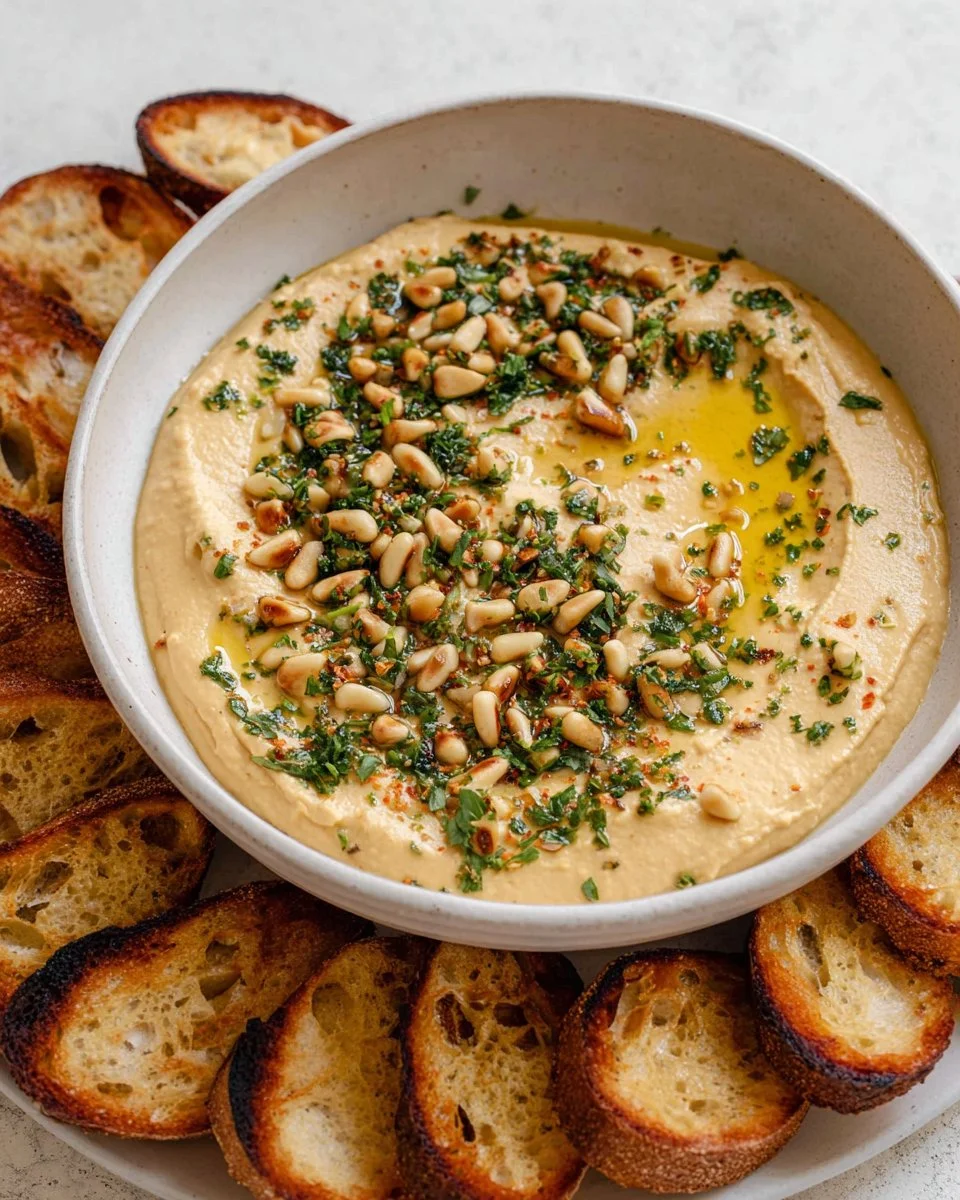
Serving time: Spoon the hummus into a lovely serving bowl. Top it with fresh herbs, a sprinkle of cumin, roasted peanuts, and a generous drizzle of olive oil before diving in.
Common Mistakes to Avoid: Over-blending can lead to a gummy texture, so keep an eye on it! Also, make sure to taste and adjust seasoning as needed.
Expert Tips & Tricks
-
Storage Recommendations: If you have leftover hummus, store it in an airtight container in the fridge for up to a week. Just give it a quick stir before serving again!
-
Make-Ahead Instructions: You can prepare this chickpea hummus a day or two in advance—just keep it sealed in the fridge. Just don’t be surprised if it disappears quickly!
-
Troubleshooting: If your hummus tastes bland, it might need more salt or acidity from lemon juice! Always taste as you go to perfect those flavors.
-
Longer Shelf Life: To freeze, place portions of hummus in ice cube trays or muffin tins, freeze, then pop out and store in a zip-top freezer bag for up to three months.
-
Perfect Pairings: Hummus can also be combined with yogurt for a unique twist—try mixing in some Greek yogurt for added creaminess and tang.
Serving Suggestions
Chickpea hummus is a versatile dip that can be served with a variety of options:
- Vegetable Platters: Carrot sticks, cucumber slices, bell pepper strips, and cherry tomatoes make excellent dippers.
- Bread Options: Pair your hummus with warm pita bread, crispy tortilla chips, or crunchy breadsticks.
- Occasion Recommendations: Serve it at holiday gatherings, casual dinners, or even as a wholesome snack for kids!
To present it beautifully, try swirling the olive oil on top before adding garnishes.
Variations & Substitutions
-
Spiced Variations: Add smoked paprika or cayenne for a smoky kick or some red pepper flakes for heat.
-
Herbal Adaptations: Experiment with herbs like dill or basil for a different flavor profile.
-
Flavor Enhancements: Swap the peanut butter for tahini for a traditional twist, or use almond butter for a nutty option.
-
Dietary Restrictions: This recipe is dairy-free and vegan, making it suitable for a broad audience; however, make sure to double-check ingredients for specific dietary needs.
Nutrition & Storage Info
- Prep Time: 10 minutes
- Cook Time: 0 minutes
- Total Time: 10 minutes
- Yield: About 2 cups (4 servings)
- Estimated Calories per serving: Approximately 160 calories
- Storage Instructions: Store leftovers in the fridge for a week or freeze for three months.
FAQ Section
-
Can I replace chickpeas with another bean?
Certainly! White beans, like cannellini, can be used for a different flavor. Just keep in mind it will change the overall taste and texture.
-
Is hummus gluten-free?
Yes, hummus is naturally gluten-free! Just be sure to serve it with gluten-free dippers.
-
How can I make it spicier?
Add more garlic, jalapeño, or chili flakes for that extra heat sprinkle to taste.
-
Can I make this in bulk?
Absolutely! Just scale the recipe up as needed. It’s perfect for parties and gatherings.
-
Is it possible to incorporate veggies into the hummus?
Yes! Roasted beetroot, carrots, or spinach can be blended in for added color and flavor.
-
How do I store hummus?
Keep it in an airtight container in the fridge for up to a week or freeze for longer storage.
-
What if I don’t have a food processor?
A high-speed blender works well, or you can use an immersion blender if you want to skip the transfer.
-
Can I make this without garlic?
Sure! Omit it for a milder flavor; the other ingredients still create a delightful taste.
-
How can I add more protein to my hummus?
Consider adding some Greek yogurt or protein powder for a protein boost.
-
Can I use dried chickpeas instead of canned?
Yes, but you’ll need to soak and cook them first. Soaking overnight and cooking until tender is key for optimal texture.
Conclusion
This chickpea hummus recipe is special because it takes a timeless classic and gives it a delightful twist with the addition of peanut butter. It’s not just about making a snack; it’s about creating moments of joy with family and friends over delicious food.
I encourage you to try this recipe and make it your own! Don’t forget to let me know how it turns out in the comments below. And if you love this recipe, check out my other delicious dips and spreads on the blog; there’s something for every occasion! Happy eating!