Irresistibly Creamy Oreo Milkshake: The Ultimate Indulgence
Ah, the Oreo Milkshake. Just the thought of this creamy delight stirs up cherished childhood memories—like the time my siblings and I stumbled into the kitchen after a hot summer day, already dreaming of that deliciously sweet reward waiting for us in the freezer. Gathering around the blender, the air would be filled with the nostalgic crunch of Oreo cookies being mixed with velvety ice cream and milk. It was a family tradition to savor this dreamy concoction after dinner, a comforting ritual that brought us together.
What makes this Oreo Milkshake recipe extra special? It’s not just the classic flavors; it’s that perfect balance of rich creaminess and chocolatey crunch. Unlike other recipes that might skimp on flavor or texture, this one brings everything to life with a deliciously thick blend. When you take your first sip, you’re welcomed by the unforgettable combination of sweet vanilla ice cream mingling with the iconic crunch of Oreos—a taste sensation that feels like a warm hug.
In this post, I promise to share all my secret tips for making the perfect Oreo Milkshake, so you can recreate those joyful family moments in your own home. Let’s dive in!
What Are Oreo Milkshakes?
The Oreo Milkshake may not need much introduction, but it certainly has a fascinating backstory. The humble Oreo cookie, created in 1912, quickly became an American classic, and blending it with milk and ice cream was a stroke of genius that forever changed dessert. The result is a luscious treat that strikes the perfect balance between sweetness and that unmistakable crunch.
When you sip on an Oreo Milkshake, you’re treated to a luxurious blend of creamy vanilla ice cream and whole milk, with crunchy bits of Oreos whipped in for good measure. The texture is smooth—almost like drinking a thick cloud of nostalgia. They’re famous for being a summer refreshment, but honestly, any time is a good time for an Oreo Milkshake!
Whether you’re having a movie night with friends or simply want to indulge yourself after a long day, this recipe is your go-to choice for that perfect blend of sweetness and comfort.
Why You’ll Love This Recipe
-
Mouthwatering Flavor: This recipe takes your classic Oreo Milkshake to another level, blending in real vanilla extract and perfectly soft ice cream for an irresistible taste that beats any store-bought option. You’ll enjoy a transformation from bland commercial shakes into a rich, homemade experience.
-
Cost-Effective: Why spend money at a café when you can whip up this incredible treat for a fraction of the cost? The ingredients are simple and inexpensive—think about it, a mere handful of Oreos, milk, and some ice cream will feed your cravings without breaking the bank!
-
Customizable to Your Taste: One of the joys of making your Oreo Milkshake is that it’s completely up to you! Want it extra chocolaty? Toss in some chocolate syrup. Prefer a twist? Swap the vanilla ice cream for cookies and cream.
-
Quick and Easy: It takes less than ten minutes to create this masterpiece! Beginner or expert, you’ll find this recipe delightfully straightforward, making it great for last-minute cravings or surprise guests.
-
Perfect for Any Occasion: Birthdays, barbeques, or just a cozy weekend at home, this milkshake fits right in. It’s a versatile dessert, and its easy preparation means you can be a hero in the kitchen without the fuss.
Let’s get started, shall we?
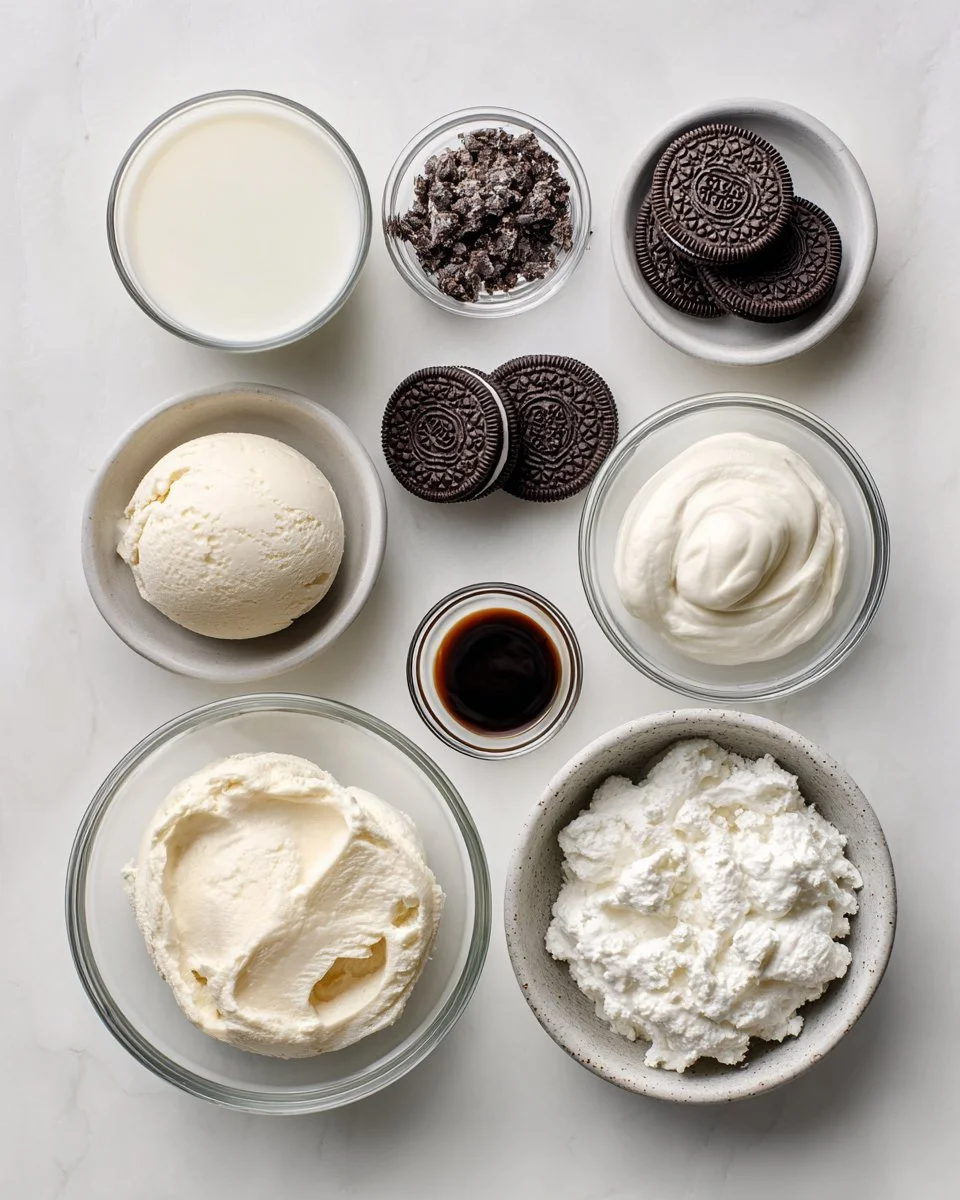
Ingredients Section
For this rich and creamy Oreo Milkshake, you’ll need:
- 2 cups (344 g) vanilla ice cream, softened slightly (I recommend Haagen-Dazs for a richer taste)
- 1/2 cup (122 g) whole milk (If you prefer a lighter version, you can opt for skim or almond milk)
- 6-8 Oreo cookies, roughly chopped (Feel free to use the Double Stuf for even more gooeyness!)
- 1/2 teaspoon vanilla extract (only use pure vanilla for that genuine flavor)
- Whipped cream, optional, for topping (homemade is best!)
- Oreo cookies, optional, for topping (more crunch is always better!)
- Chocolate syrup, optional, for topping (get that drizzle on for extra decadence!)
Preparation Notes: Make sure your ice cream is just softened enough to blend easily but not too melted. If you’re using butter-based whipped cream as a topping, allow it to sit at room temperature for about ten minutes before whipping it up.
Step-by-Step Instructions
1. Blend the Base
Start by placing the softened vanilla ice cream (2 cups), whole milk (1/2 cup), and vanilla extract (1/2 teaspoon) into a blender. Blend on high speed for about 30-60 seconds until the mixture is beautifully smooth and creamy.
2. Add the Oreos
Next, add your roughly chopped Oreos (6-8). Pulse the blender gently until the Oreos are combined into the milkshake, making sure not to over-blend—you want to keep some delicious cookie bits for texture.
3. Adjust Your Consistency
At this point, you will want to check the thickness. If you find your milkshake is too thick, you can add a little more milk (a tablespoon at a time), blend again, and check until you reach your desired consistency. Conversely, if it’s too thin, toss in more ice cream and blend until just mixed.
4. Serve it Up
Pour your luscious Oreo Milkshake into a tall glass. Feel free to indulge in toppings: add whipped cream, sprinkle more Oreo pieces, and drizzle chocolate syrup on top for that Pinterest-perfect finish!
Chef’s Tips
- Visual Cue: The milkshake should have a thick, creamy consistency that pulls away from the sides of the blender.
- Don’t Over-Blend: Remember to pulse instead of blending continuously after adding Oreos to retain that cookie crunch.
- Common Mistakes: Avoid using water-like milk; use full-fat milk for the tastiest outcome.

Expert Tips & Tricks
- Storage: If you have leftovers (which I doubt!), transfer them into an airtight container and freeze for up to two days. Chocolate syrup can be mixed in before freezing for added flavor.
- Make Ahead: This milkshake is best enjoyed fresh, but you can prepare the base ahead of time and store it in the fridge before adding cookie bits and blending.
- Troubleshooting: If your shake is too sweet, balance it out with a pinch of salt while blending.
Serving Suggestions
Pair your Oreo Milkshake with a side of warm cookies or enjoy it alongside a slice of rich chocolate cake. As for presentation, charming straws and a sprinkle of cookie crumbs can elevate your shake to an impressive dessert—perfect for any fun occasion or just a cozy night in!
Variations & Substitutions
- Different Flavor Combinations: Explore adding peanut butter for a Peanut Butter Oreo Milkshake or mint extract for a Mint Oreo twist!
- Dietary Adaptations: Keep it dairy-free by using coconut ice cream and almond milk. Swap in gluten-free Oreo cookies if that’s your goal.
- Seasonal Variations: During the winter holidays, a sprinkle of peppermint can add a festive twist, or come summer, add fresh berries to create a more fruit-forward take.
Nutrition & Storage Info
- Prep time: 10 minutes
- Total time: 10 minutes
- Yield: 2 servings
- Estimated calories per serving: 450 (may vary based on ingredients used)
- Storage Instructions: Best enjoyed fresh, but if you must store, keep in an airtight container in the freezer for 1-2 days.
FAQ Section
-
Can I use low-fat milk?
- Absolutely, but keep in mind it might alter the creamy texture slightly. Full-fat milk offers the best results.
-
How can I make it vegan?
- Use dairy-free ice cream and plant-based milk, such as almond or oat milk, along with vegan Oreo cookies.
-
What’s the best way to crush the Oreos?
- You can place them in a zip-style bag and crush with a rolling pin; it’s a great stress reliever too!
-
Can I make it ahead of time?
- It’s best enjoyed fresh, but you can prepare the base ahead of time and mix in the cookies just before serving.
-
What if I want it thicker or thinner?
- Adjust by controlling the milk and ice cream ratio as mentioned previously.
-
Can I add more cookies for a higher cookie ratio?
- Definitely! The more cookies, the better, just keep blending times in mind to avoid a powdery texture.
-
How long will it last in the freezer?
- Ideally, consume within two days for the best taste and texture.
-
Can I use other cookie flavors?
- Yes! Feel free to experiment with Nutella cookies or even chocolate chip cookies for a unique twist.
-
Should I use homemade whipped cream?
- Homemade is best for taste, but store-bought will do if you’re short on time.
-
What’s a good topping idea?
- In addition to whipped cream, some chocolate shavings or sprinkles would be delightful!
Conclusion
There you have it! This Oreo Milkshake recipe isn’t just a treat; it’s a delicious journey down memory lane, filled with joy, nostalgia, and sweetness. I encourage you to give it a try and let the flavors awaken those lovely family memories in every sip. If you do, I’d love to hear how yours turned out—leave a comment or share your experience! And don’t forget to check out other cozy recipes on my blog, like my classic chocolate chip cookies or no-bake cheesecake. Happy blending!
Oreo Milkshake
Ingredients
Method
- Start by placing the softened vanilla ice cream, whole milk, and vanilla extract into a blender. Blend on high speed for about 30-60 seconds until the mixture is beautifully smooth and creamy.
- Next, add your roughly chopped Oreos. Pulse the blender gently until the Oreos are combined into the milkshake, making sure not to over-blend—you want to keep some delicious cookie bits for texture.
- Check the thickness of the milkshake. If it’s too thick, add more milk a tablespoon at a time, blending until you reach the desired consistency. If it’s too thin, add more ice cream and blend until just mixed.
- Pour your luscious Oreo Milkshake into a tall glass. Add whipped cream, sprinkle more Oreo pieces, and drizzle chocolate syrup on top for extra decadence.