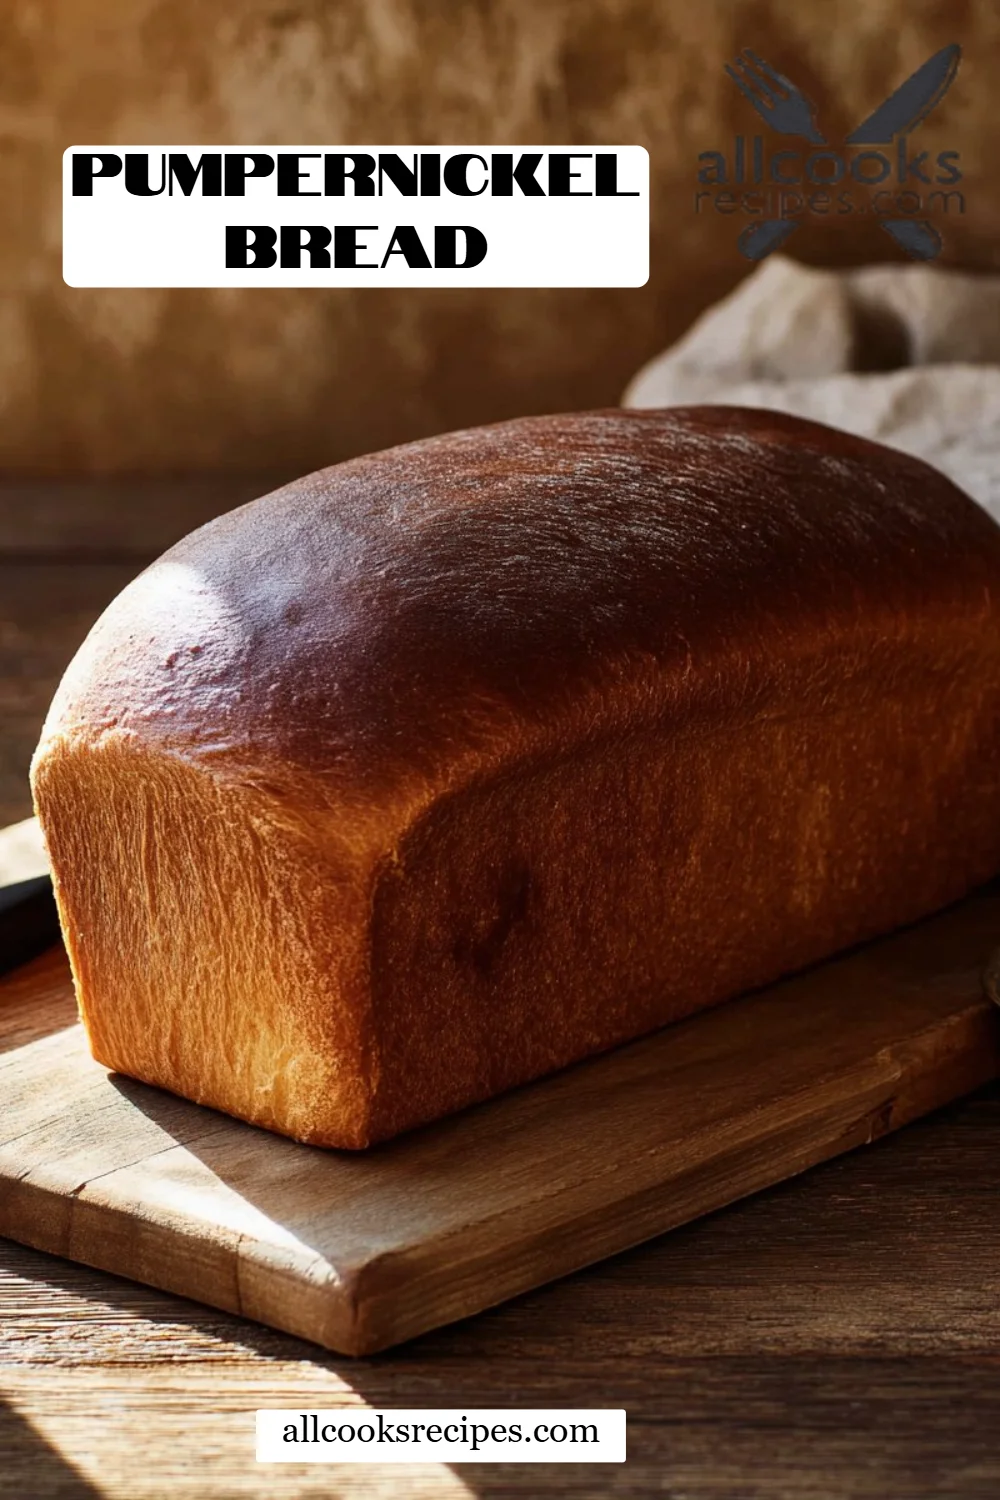
Irresistible Pumpernickel Bread: The Ultimate Comfort Food You Need to Try!
Growing up, whenever my family gathered around the table for a meal, we often found one special guest sitting right in the center: a beautiful, dark loaf of pumpernickel bread. It wasn’t just a side; it was a staple, a tradition that warmed our hearts and filled our bellies. The deep, rich flavor paired perfectly with everything from savory spreads to robust soups, creating an unforgettable dining experience.
What I adore most about my Pumpernickel Bread recipe is that it not only captures those cherished family moments but elevates them with a texture that’s both hearty and tender. This loaf is distinctly more flavorful and aromatic than any store-bought version you’ll ever find. No artificial additives here, just wholesome ingredients that bring back nostalgia with each bite. I promise you, this recipe is easy to follow and will make your kitchen smell heavenly!
By the end of this post, you’ll learn how to create that same delicious pumpernickel bread that graced my childhood dining table. Plus, I’ll share tips and tricks to ensure yours comes out perfectly, time after time.
What Are Pumpernickel Bread?
Pumpernickel bread originates from Germany, where it’s cherished for centuries as a staple in many households. Traditionally made using coarsely ground rye flour, this bread has a distinctively dense and dark exterior, enriched with a unique flavor that is slightly sweet and nutty. The name itself might stem from the German words "pumpern," meaning "to fart," and "nickel," which is a nickname for the devil — a curious tale for a loaf that’s delightfully satisfying!
The texture is both hearty and chewy, making pumpernickel the perfect canvas for bold toppings. What’s more, its dark color often comes from the addition of cocoa powder, contributing not just to its appearance but also to its rich, complex flavor profile. When the bread is baked, it develops a glossy crust that crackles slightly during cooling — absolute heaven for your taste buds.
Whether you’re planning a cozy dinner or a festive brunch, pumpernickel bread has a place at the table. It pairs famously with cheeses, meats, and spreads, or you can simply enjoy it with butter for an uncomplicated yet satisfying treat.
Why You’ll Love This Recipe
Here’s why my pumpernickel bread recipe stands out from the rest:
-
Homemade Goodness: Store-bought pumpernickel can be loaded with preservatives and artificial ingredients. This homemade version? Pure, wholesome goodness that you can feel proud to serve. Made with high-quality ingredients, each bite offers authentic flavor that can’t be replicated.
-
Cost-Effective: Making bread at home is surprisingly budget-friendly. With simple pantry staples, you can create two loaves of pumpernickel for less than what you’d pay for one pre-packaged loaf from the store.
-
Customization Options: Want to add seeds for texture or swap out rye flour for a gluten-free alternative? Go ahead! This recipe allows you the freedom to tailor each loaf to your personal taste preferences.
-
Difficulty Made Easy: Surprisingly, this pumpernickel bread is straightforward to make. If you’re new to baking, fear not! I’ll walk you through it step-by-step so you can feel confident and proud of your efforts.
-
Timely and Rewarding: While we do have to wait for the dough to rise, the actual hands-on time is minimal. You can whip this up and still binge-watch your favorite show while waiting for the magic to happen.
Trust me; you’ll be pulled back into the kitchen time and time again for more of this delicious pumpernickel bread!
Ingredients
Before we dive into the baking, let’s gather our ingredients. Here’s what you need:
- 2 1/2 cups all-purpose flour: All-purpose flour gives you that nice balance of structure and softness.
- 1 cup bread flour: This adds additional elasticity and chewiness for an incredible texture.
- 1 cup medium rye flour: A must for authentic pumpernickel flavor. Look for a high-quality rye for the best results.
- 2 tablespoons unsweetened cocoa powder: Provides that dark, rich color and depth of flavor.
- 5 teaspoons instant yeast: This helps your bread rise beautifully.
- 1 tablespoon granulated sugar: Just a touch of sweetness to balance the flavors.
- 1 tablespoon kosher salt: Essential for enhancing the taste.
- 1 1/2 cups warm water (105-115°F): Ensure your water is within this range; too hot can kill the yeast, too cold will slow it down.
- 1/2 cup molasses: The secret for an intense sweetness and depth; dark molasses works wonderfully.
- 2 tablespoons vegetable oil: Helps improve the bread’s texture and keep it soft.
Ingredient Notes:
- Flours: For a gluten-free option, you could try a gluten-free baking blend instead of the all-purpose and bread flour.
- Cocoa Powder: Dutch-processed cocoa can enhance flavor while maintaining that lovely dark color.
- Yeast: I recommend using instant yeast for a no-fuss experience, but if you have active-dry yeast, it will work fine — just let it bloom in the warm water for a few minutes before mixing it in.
Step-by-Step Instructions
Ready to get your bake on? Let’s roll up our sleeves!
-
Prepare the Pan: Begin by spraying a 9×5-inch loaf pan with nonstick cooking spray. Set it aside while you prepare the dough.
-
Mix Dry Ingredients: In a large bowl, whisk together the all-purpose flour, bread flour, rye flour, cocoa powder, yeast, granulated sugar, and kosher salt until combined.
-
Combine Wet Ingredients: In the bowl of a stand mixer, combine the warm water, molasses, and vegetable oil. Stir gently to combine.
-
Mix to Form Dough: Gradually add the dry ingredients to the wet ingredients. Mix on low speed until a shaggy dough forms, about 1-2 minutes.
-
Knead the Dough: Knead the dough for 5-8 minutes until it’s smooth and elastic. If you’re doing this by hand, flour your surface lightly and knead for about 8-10 minutes.
-
First Rise: Place the kneaded dough in a large oiled bowl, cover with plastic wrap or a damp cloth, and let rise in a warm place until it has doubled in size, about 60-90 minutes. You’ll know it’s ready when you gently press a finger in and the indentation remains.
-
Shape the Dough: Turn the dough onto a floured surface and roll it out into a rectangle. Roll tightly into a log, pinching the seams to seal.
-
Second Rise: Place the log seam-side down in the prepared loaf pan. Cover and let it rise again until doubled in size, about 45 minutes.
-
Preheat the Oven: As the dough rises, preheat your oven to 375°F (190°C).
-
Bake the Bread: After the second rise, bake the loaf for 50-55 minutes or until it sounds hollow when tapped. This is an important step, as it means the bread is perfectly baked inside.
-
Cool and Slice: Allow the bread to cool in the pan for about 15 minutes, then cool completely on a wire rack before slicing. Store at room temperature for up to 3 days or freeze for up to 8 weeks.

Chef’s Tips:
- Kneading: If your dough feels too sticky, dust a little more flour while kneading until just tacky.
- Texture: Test the dough’s elasticity by stretching it. If it tears easily, it may need a bit more kneading.
- Cold Weather Rising: If your kitchen is chilly, you can create a warm environment by placing your dough in an oven set to the lowest temperature for a few minutes, then turning it off.
Expert Tips & Tricks
To ensure your pumpernickel bread turns out perfect, consider these expert tips:
-
Ingredient Quality: Always use fresh flour and yeast. Old ingredients can lead to dull flavors and poor rises.
-
Storing Bread: Keep your bread in a paper bag at room temperature for 3 days. For longer storage, wrap tightly in plastic and freeze; remember to slice before freezing for easy use!
-
Make-Ahead: You can prepare the dough a day in advance. Simply knead, rise, then refrigerate covered overnight. Allow it to come to room temperature before shaping.
-
Troubleshooting: If your bread doesn’t rise as expected, it may be due to expired yeast. Always do a quick yeast test with warm water and sugar before using!
-
Ingredient Substitutions: You can swap molasses with honey or agave syrup if you’re leaning towards a lighter sweetness.
-
Variations: Think outside the box—add seeds such as sunflower or caraway into the dough for an extra crunch.
Serving Suggestions
So, how do you enjoy this amazing pumpernickel bread? The options are endless! Here are a few serving suggestions:
- Classic Pairings: Serve it alongside hearty soups or warm stews for a warming meal.
- Fancy Toasts: Top slices with cream cheese, smoked salmon, and capers for a Scandinavian twist.
- Cheese Board: Pair with a selection of cheeses, nuts, and jams for a beautiful charcuterie spread.
- Presentation Ideas: Serve it warm, slicing just before guests arrive to enjoy that inviting aroma.
Variations & Substitutions
Feeling adventurous? Here are a few ideas to mix up this pumpernickel bread:
- Flavored Add-Ins: Try adding caraway seeds, orbits of walnuts, or pumpkin seeds for an extra special crunch.
- Seasonal Twists: During the fall, add spices like cinnamon and nutmeg for a cozy autumn flavor.
- Diet-Friendly Versions: For a vegan option, substitute vegetable oil with melted coconut oil and replace honey with maple syrup.
Nutrition & Storage Info
This recipe yields about 12 servings, with each slice packed with flavor and nutrients.
- Prep Time: 20 minutes
- Cook Time: 50-55 minutes
- Total Time: About 2 hours (including rising times)
- Estimated Calories: Approximately 130 calories per slice.
Storage:
- Room temperature: Up to 3 days.
- Freezer: Wrap carefully in plastic for up to 8 weeks.
FAQ Section
-
Can I use all rye flour instead of a mix?
While you can, pure rye flour will make the bread denser. Using a blend yields a better texture. -
How can I tell if my dough has risen enough?
When you poke a finger into the dough and it holds the indentation rather than bouncing back, it’s ready! -
Can I substitute honey for molasses?
Yes, but it will alter the flavor slightly. Molasses gives that distinct depth. -
Should I slice the bread while it’s warm?
It’s best to let it cool completely first to avoid a gummy texture. -
What if I don’t have a stand mixer?
No problem! You can mix and knead by hand; just remember it may take a bit of elbow grease! -
How does pumpernickel bread taste?
It’s mildly sweet, nutty, and has an earthiness from the rye. The cocoa adds depth without making it taste chocolatey. -
Can I make this recipe into rolls instead of a loaf?
Absolutely! Divide the dough into equal portions and shape into rolls. Adjust the baking time to around 25-30 minutes. -
What if the bread doesn’t rise?
Ensure your yeast is fresh and that the water was the right temperature. If it didn’t rise enough, the dough can also be left longer in a warm environment. -
Is it normal for pumpernickel bread to be denser?
Yes, pumpernickel is denser due to the rye flour, which makes for a hearty bread that is wonderfully filling. -
Can Pumpernickel bread be made gluten-free?
Yes, you can use a blend of gluten-free flours in place of the wheat flours.
Conclusion
This pumpernickel bread recipe is not just about baking; it’s about creating delicious memories to share with loved ones. The aromas filling your kitchen and the flavors dancing on your palate will assure you that homemade is always better. I truly hope you give this recipe a try — I’d love to hear your thoughts and experiences in the comments!
If you’re looking for more irresistible bread recipes or comforting favorites, don’t forget to check out my other creations! Happy baking!

Pumpernickel Bread
Ingredients
Method
- Spray a 9x5-inch loaf pan with nonstick cooking spray and set aside.
- In a large bowl, whisk together all-purpose flour, bread flour, rye flour, cocoa powder, yeast, granulated sugar, and kosher salt until combined.
- In the bowl of a stand mixer, combine warm water, molasses, and vegetable oil. Stir gently.
- Gradually add the dry ingredients to the wet and mix on low speed until a shaggy dough forms.
- Knead the dough for 5-8 minutes until smooth and elastic.
- Place it in an oiled bowl, cover, and let rise in a warm place until doubled in size (about 60-90 minutes).
- Turn the dough onto a floured surface, roll it out into a rectangle, and roll tightly into a log, sealing the seams.
- Place the log seam-side down in the prepared pan, cover, and let rise until doubled (about 45 minutes).
- Preheat the oven to 375°F (190°C).
- Bake the loaf for 50-55 minutes or until it sounds hollow when tapped.
- Allow the bread to cool in the pan for 15 minutes, then cool completely on a wire rack before slicing.