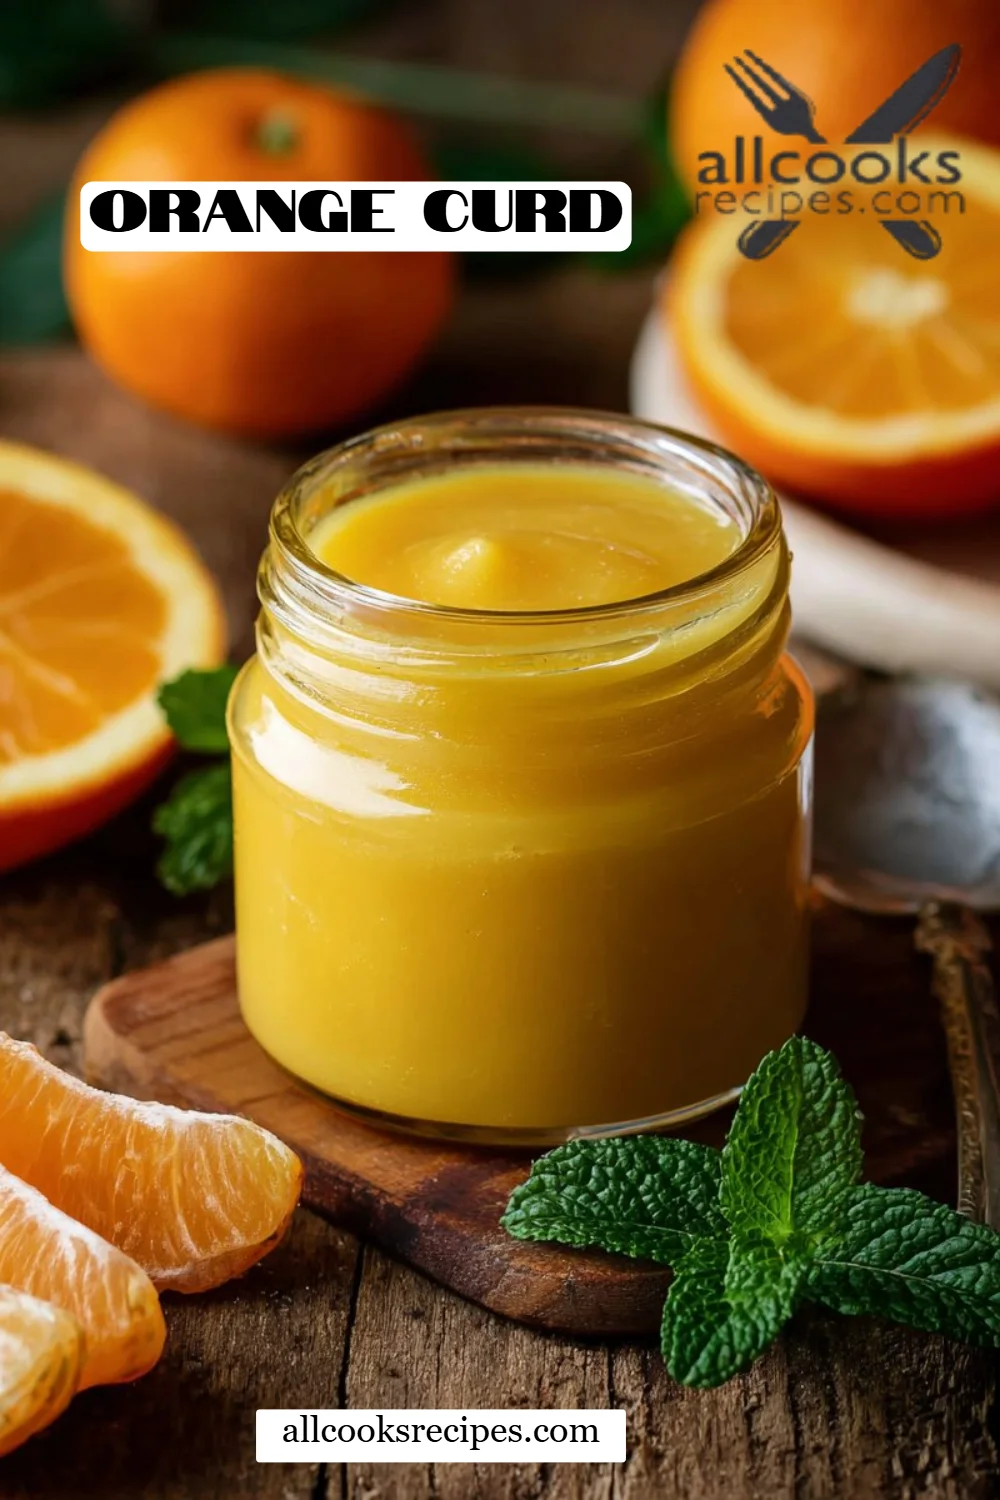
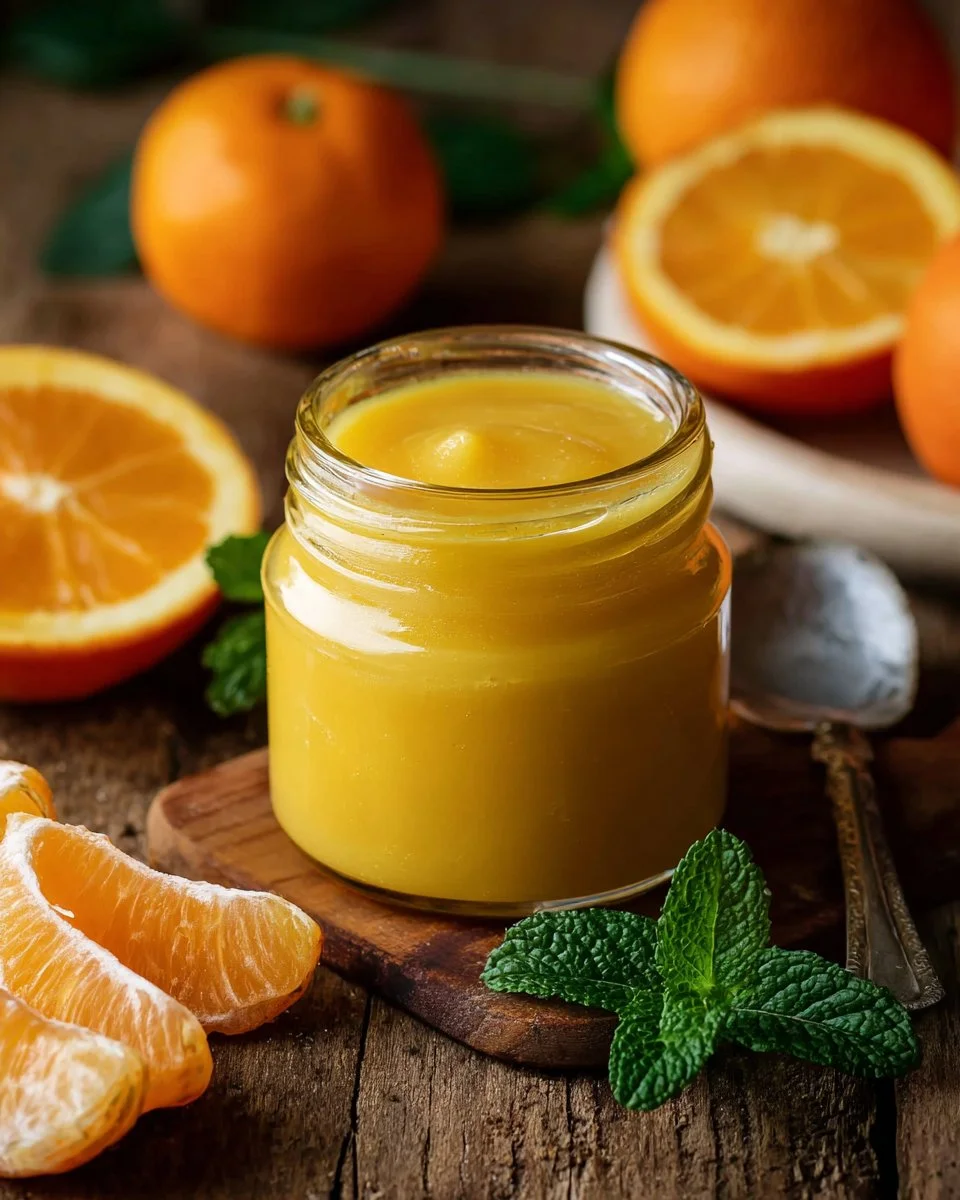
Zesty Orange Curd: A Sunshine-Inspired Treat!
Imagine waking up on a Sunday morning, sunlight streaming through the window, the aroma of fresh coffee brewing in the background, and you have a craving for something bright and delicious. That’s when my love for Orange Curd shines through. This delightfully tangy and sweet concoction isn’t just a treat; it’s a burst of sunshine in a jar that takes me back to my grandmother’s kitchen, where she would spread this velvety curd on her homemade scones.
What makes my Orange Curd recipe special? It’s that perfect balance of sweet and tart that you just can’t find in store-bought versions. It’s smooth, luscious, and a tad bit tangy—everything you want for a weekend brunch or afternoon delight. Plus, there’s something undeniably comforting about making this recipe; it’s like sharing a hug from my grandmother through every spoonful.
By the end of this post, you’ll not only learn how to make your own Orange Curd but also discover tips and tricks to make it even better. Ready to dive into a world of citrusy goodness? Let’s get started!
What Are Orange Curds?
Originating from the British Isles, curd has a long history that dates back to the 19th century when it became a staple in British desserts. Traditionally, curd is made with a citrus juice base, sugar, and eggs, creating a rich, creamy texture that’s perfect for spreading or using as a filling.
In essence, Orange Curd is orange juice and zest brought together to create a delightful contrast of flavors. The taste profile is uniquely citrusy, with a creamy mouthfeel, while the texture is smooth and silky with just the right amount of sweetness.
Why make Orange Curd? Well, the sunny flavor is perfect for elevating breakfast pastries, filling cakes, or simply enjoying with a spoon! With every bite, you experience a taste of summer that can brighten any dreary day.
Why You’ll Love This Recipe
There are countless recipes for curd, but mine has that special edge I believe you’ll adore:
-
Freshness Over Fakeness: Unlike store-bought versions loaded with preservatives, my Orange Curd is made with fresh oranges, ensuring a vibrant and lively flavor profile. You’ll notice the difference!
-
Cost-Effective Indulgence: You’d be surprised to know that making your own curd is not only more delicious but also much cheaper than buying gourmet brands. With just a few well-priced ingredients, you can whip up multiple jars!
-
Customizable to Your Taste: While my recipe focuses on the classic orange flavor, feel free to experiment! You can blend in different citrus fruits like lemon or lime for an added zing or adjust the sweetness to your preference.
-
Easy as Pie: Sounds fancy, right? But making Orange Curd isn’t as complicated as it seems. You’ll be astonished by how straightforward it is, even if you’re a novice in the kitchen.
-
Perfect Timing: The active preparation only takes about 30 minutes, and it chills in less than a couple of hours. Before you know it, you’ll have a delightful, homemade curd to enjoy!
Are you feeling excited yet? Let’s roll up our sleeves and gather those ingredients!
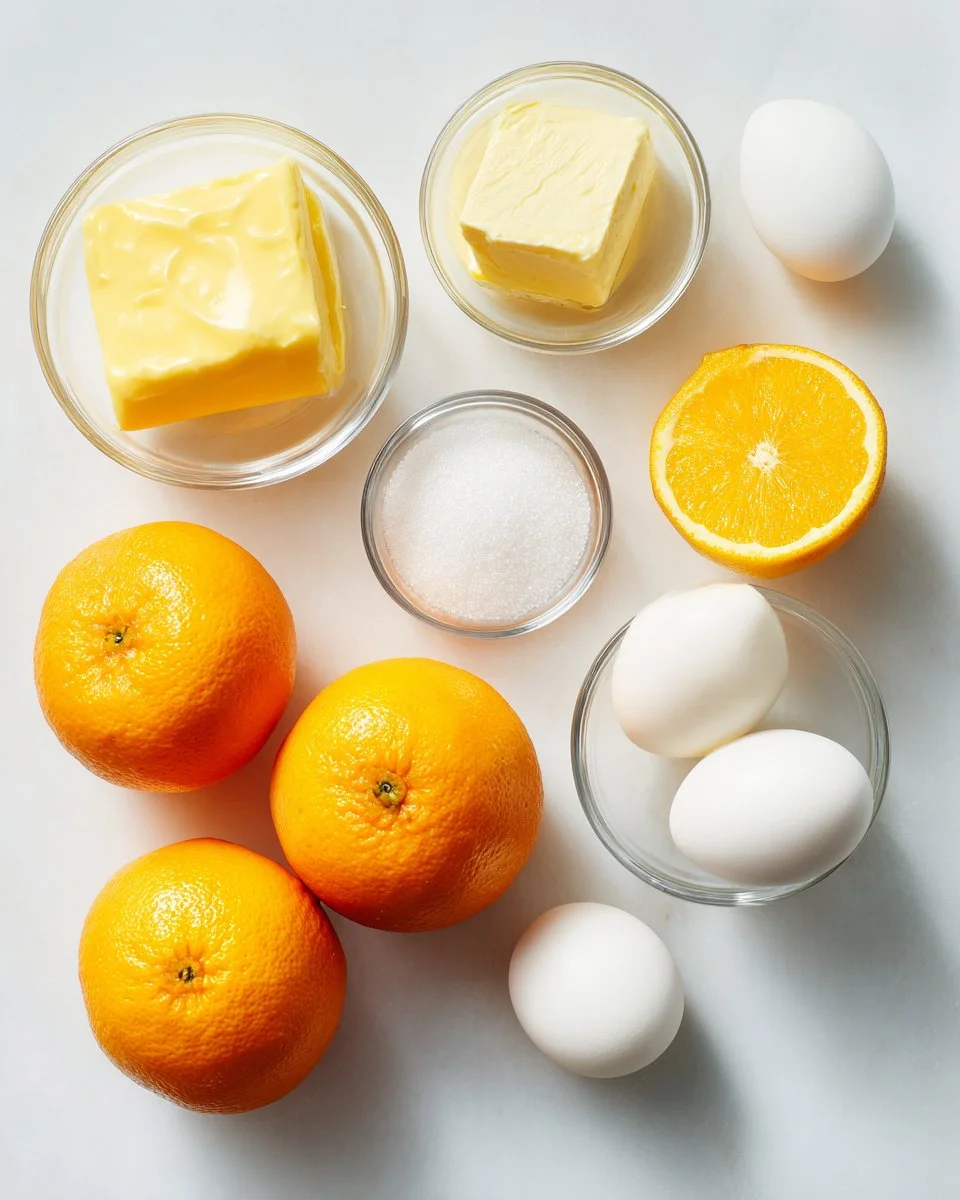
Ingredients
- 2 medium oranges: Fresh, juicy oranges yield the best flavor. You can substitute with blood oranges for a twist!
- 1/4 cup unsalted butter, room temperature: Use high-quality butter—brands like Kerrygold give that rich taste.
- 3/4 cup granulated sugar: Regular granulated sugar works perfectly here; no need for specialty sugars!
- 2 large eggs, room temperature: Cold eggs will result in a less smooth curd; let them sit out for a bit before starting.
- 1 tablespoon lemon juice: Freshly squeezed is always best for that extra zing.
Prep Notes: It’s key to have your butter and eggs at room temperature; this helps them blend seamlessly into the smooth curd.
Step-by-Step Instructions
-
Zest and Juice the Oranges: Start by grating the peels of your oranges to extract approximately 1 tablespoon of fresh zest. This is where that powerful aroma comes from! Next, cut the oranges in half and squeeze out the juice into a measuring cup. Aim for about 1/2 cup of juice.
-
Blend Butter and Sugar: In a mixing bowl, beat the room temperature butter and sugar together at medium speed until the mixture is light and creamy—around 2 minutes should do it!
-
Incorporate the Eggs: Add the eggs to the butter mixture one by one, ensuring that each egg is fully blended before adding the next. This is key for a smooth curd.
-
Mix in Juices: Gradually stir in your freshly squeezed orange juice and lemon juice at low speed, combining until blended but not overly mixed.
-
Zest It Up: Next, fold in the orange zest. Don’t worry if the mixture appears curdled; this is perfectly normal!
-
Heat the Mixture: Transfer this mixture into a heavy-bottomed stainless-steel saucepan. Cook over medium heat, whisking constantly—this is crucial! Keep whisking for 14 to 16 minutes until the mixture thickens and reaches 170°F (77°C).
-
Cool It Down: Remove the saucepan from the heat and transfer the hot curd to a heat-safe bowl. Cover it with plastic wrap directly on the surface to prevent a film from forming.
-
Chill Time: Allow it to chill in the refrigerator for at least two hours—or until it firms up nicely.
-
Storing: Transfer your cooled Orange Curd into an airtight container and keep it in the fridge for up to 2 weeks.
Chef’s Tip: Keep a close eye on the temperature while cooking. If it reaches boiling, your curd can curdle!
Expert Tips & Tricks
-
Freshness is Key: Always use fresh oranges for the best flavor; if you can find organic ones, even better!
-
Use a Thermometer: A candy thermometer is your best friend here, helping to ensure you reach the right thickness without the guesswork.
-
Storage Recommendations: Store your Orange Curd in sterilized jars for longevity.
-
Make-Ahead Magic: This curd can be made a few days in advance, making it perfect for parties and prepping for busy weekdays.
-
Troubleshooting: If your curd is too thin, continue to cook it for a few more minutes until it thickens further. Don’t rush this step!
Serving Suggestions
Let your delicious Orange Curd shine as the star of the show! Here are a few ideas:
- Spread on Toast or Scones: Nothing beats a generous tablespoon of Orange Curd spread on warm, buttery toast or freshly baked scones.
- Topping for Desserts: Use it to enhance tarts, layer cakes, or even cheesecake—trust me, it’s an incredible addition!
- Brighten Up Breakfasts: Swirl it into yogurt or oatmeal for a refreshing twist to your morning routine.
Variations & Substitutions
- Flavor Combinations: Try adding a splash of vanilla extract for depth or a hint of cardamom for warmth.
- Seasonal Variations: In winter, try incorporating a touch of cranberries blended into the curd.
- Dietary Adaptations: If you’re looking to make it vegan, you could explore egg substitutes and plant-based butter options, although results may vary.
Nutrition & Storage Info
- Prep Time: 30 minutes
- Cook Time: 16 minutes
- Total Time: Approximately 2.5 hours (including refrigeration)
- Yield: About 1 ½ cups of Orange Curd
- Estimated Calories: Approximately 110 calories per tablespoon
- Storage: Refrigerate for up to 2 weeks; do not freeze, as it can change the texture.
FAQ Section
-
Can I freeze Orange Curd?
Freezing is not recommended as it can alter the texture. Enjoy it fresh! -
What can I serve with Orange Curd?
It pairs beautifully with breakfast items like pancakes, waffles, and pastries. -
Can I use this curd in baking?
Absolutely! It’s fantastic for filling cakes, tarts, or even used as a drizzle over desserts. -
How do I know when the curd has thickened?
It should coat the back of a spoon and have the consistency of pudding when it’s ready. -
What if my curd curdles?
If that happens, you’ll need to strain it through a sieve to smooth out any lumps. -
Can I adjust the sweetness?
Yes! Feel free to add more or less sugar to taste, but keep in mind it might affect the texture slightly. -
Is there a substitute for fresh orange juice?
While fresh juice is best, you could use bottled juice if that’s all you have, but the flavor will be muted. -
Can I mix flavors?
Absolutely! Mixing lemon juice with orange for a tangy blend is delicious! -
How do I store my curd?
Transfer it to sterilized jars or containers and refrigerate for freshness. -
Can I can this curd?
Home canning is tricky; I recommend refrigerating it for safety.
Conclusion
This Orange Curd has officially become my go-to recipe for adding a burst of flavor to any meal, reminding me of cherished moments in the kitchen and bringing warmth to my day. I can’t wait for you to experience that sunny taste too! If you try this recipe, I’d love to hear your thoughts and any adaptations you made in the comments below.
For more sweet treats, don’t miss my recipes for Lemon Curd and Coconut Cream Tart right here on the blog! Happy baking!

Orange Curd
Ingredients
Method
- Zest and juice the oranges: Start by grating the peels of your oranges to extract approximately 1 tablespoon of fresh zest. Next, cut the oranges in half and squeeze out the juice into a measuring cup. Aim for about 1/2 cup of juice.
- Blend butter and sugar: In a mixing bowl, beat the room temperature butter and sugar together at medium speed until the mixture is light and creamy—around 2 minutes should do it!
- Incorporate the eggs: Add the eggs to the butter mixture one by one, ensuring that each egg is fully blended before adding the next.
- Mix in juices: Gradually stir in your freshly squeezed orange juice and lemon juice at low speed, combining until blended but not overly mixed.
- Zest it up: Next, fold in the orange zest. Don’t worry if the mixture appears curdled; this is perfectly normal!
- Heat the mixture: Transfer this mixture into a heavy-bottomed stainless-steel saucepan. Cook over medium heat, whisking constantly for 14 to 16 minutes until the mixture thickens and reaches 170°F (77°C).
- Cool it down: Remove the saucepan from the heat and transfer the hot curd to a heat-safe bowl. Cover it with plastic wrap directly on the surface to prevent a film from forming.
- Chill time: Allow it to chill in the refrigerator for at least two hours—or until it firms up nicely.
- Storing: Transfer your cooled Orange Curd into an airtight container and keep it in the fridge for up to 2 weeks.